Getting Started
Welcome to the galaxy, pilot. Here's what you need to know to get moving.
The Map
STAR DEWAR takes place on a hexagonal sector map. There are two kinds of sectors:
- Path sectors — navigable space you can fly through.
- Edge sectors — the boundary of the map. You can't fly into these.
As you explore, sectors you've visited stay revealed on your map, along with
any ports you've discovered along the way. Sectors near your starting point
and the Stardock are marked as Fedspace — a safe zone where
combat and trade routes are disallowed.
Moving Around
- Click or tap a sector on the map to fly there. If it's more than one
hop away, your ship will automatically plot a path through connected
sectors.
- Keyboard: use the arrow keys or WASD to move. Combining two
directions (e.g. Up + Right) moves you diagonally along the hex grid.
Movement costs turns — the number of turns spent depends on your ship's
turns per warp stat and how many sectors you travel through. Turns
regenerate slowly over time, so plan your trips.
Some sectors hide wormholes that link distant parts of the galaxy in a
single warp — see Wormholes.
You can also tell the autopilot to steer clear of trouble spots — see
Avoiding Sectors on the Travel page.
Turns and Credits
- You start with 2,000 turns and 500 credits.
- Turns regenerate automatically over real-world time (250 every 3 hours,
capped at 3,000) — see Seasons & Turns for the details.
- Credits are earned by trading (see Trading) and destroying
enemy ships or trade routes (see Combat).
Seasons
Each game runs as a 14-day season, shown as Day 3/14 in the status
bar. When the season ends the galaxy is locked until the next big bang
resets the map and every pilot starts fresh. See
Seasons & Turns.
What To Do
A good first session looks like:
- Fly around and discover a few nearby ports.
- Dock at a port and check its port class to see what it buys and sells.
- Buy low at one port, sell high at another — that's the core trading loop.
- Visit Stardock to spend your credits on fighters, shields, and cargo
capacity so you can trade more and survive combat.
Keep an eye on the Ship Info panel (the info button in the map area) —
it shows your fighters, shields, cargo, and trade drones at a glance.
Seasons & Turns
STAR DEWAR is played in short, self-contained seasons. Everything you
build — credits, ships, planets, Citadels, rank — counts for the current
season only, so the pace is deliberately quick.
The 14-Day Season
- A season lasts 14 days. Day 1 begins the moment the galaxy is created
(the "big bang").
- Your current day is shown in the status bar as
Day 3/14, and on the
main page as Day 3 of 14. The status bar counter turns yellow during
the final two days.
- When the last day ends the galaxy is locked: you can no longer fly,
trade or fight. The season page shows a "season finished" notice.
- While locked you can still browse the Leaderboard, the Universe
Log and your Achievements for that season for two more weeks —
final standings stay visible from the season list.
- Every season is a brand-new map and every pilot starts from scratch with
a fresh ship, credits, turns and achievements. Only your account carries
over.
Overlapping Seasons
Seasons are numbered (Season 1, Season 2, ... at /s1/, /s2/, ...) and the main page lists the
most recent ones. A new season begins two days before the current one
ends, so for a short window two seasons are open at once:
- You can play in one season at a time. Once you have joined a season
you stay in it until it finishes.
- During the overlap a pilot who is not in the ending season — or whose
season has just finished — can join the new one straight away.
- If you are still flying in the ending season, the new one shows as
Playing Season N in the list; it opens up for you the moment your current
season ends.
Since colonists keep producing and Citadels keep building while you are
offline, planning your long-running projects around the calendar matters —
a Citadel started on day 12 may never finish.
Turns
Turns are the action currency of the game. Almost everything you do costs
turns: moving between sectors, docking, claiming a planet, deploying mines,
swapping ships, and so on. The exact cost of your next action is shown as
TPA (turns per action) in the status bar.
Starting Allocation
Every new pilot starts the season with 2,000 turns and 500 credits.
Regeneration
- You receive 250 turns every 3 hours of real time, whether or not you
are logged in — that's 2,000 turns per day.
- Turns accumulate up to a cap of 3,000. Once you hit the cap, further
regeneration is lost until you spend some, so it pays to check in at least
once a day.
- Regeneration is aligned to your own clock: it ticks from the time you last
received turns, not on a fixed global schedule.
Spending Turns Wisely
- Movement cost is your ship's turns per warp × the number of sectors
travelled. A Scout Marauder (2 turns/warp) covers three times the distance
of a Colonial Transport (6 turns/warp) for the same turns. See
Ships.
- Trade routes advance as you spend turns moving around, so a busy pilot
earns more from routes than an idle one. See Trading.
- Colonist hauling is the biggest turn sink in the game — one colonist per
cargo hold, and a Level 6 Citadel needs 3,000 of them. Pick a planet close
to Terra and use a large ship. See Planets.
- Waiting in Fedspace is a safe way to let turns regenerate
without risk of ambush.
Trading
Trading is the main way to earn credits. There are three commodities in the
galaxy:
- Fuel Ore (Ore)
- Organics (Org)
- Equipment (Eqp)
Port Classes
Every port has a port class — a 3-character code, one letter per
commodity in the order Ore / Organics / Equipment:
B — the port Buys that commodity (you can sell it there)S — the port Sells that commodity (you can buy it there)
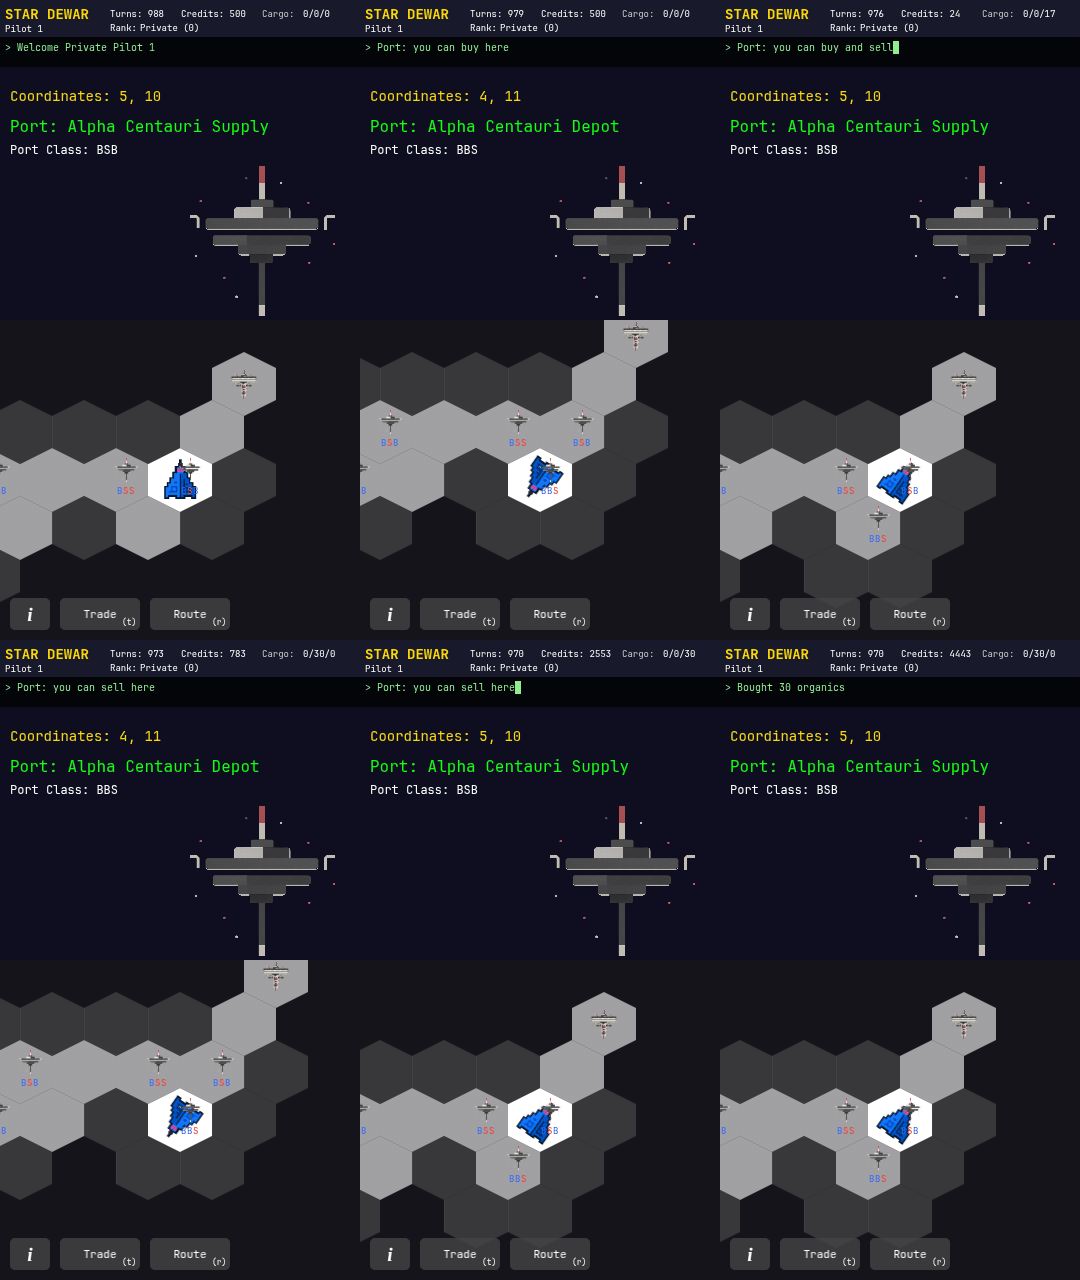
For example, a port classed BSB buys ore, sells organics, and buys
equipment. There are 8 possible combinations, from BBB (buys everything)
to SSS (sells everything).
The classic trading loop is to find a port that sells a commodity
cheap, then find a nearby port that buys the same commodity, and shuttle
cargo between them.
Manual Trading
To trade manually, fly to a port and open the Trade panel (hotkey T).
You'll see the port's stock and price for each commodity it trades.
- Buying fills your cargo with as much of a commodity as you can afford
and have room for — limited by the port's stock, your credits, and your
ship's free cargo holds.
- Selling offloads as much of a commodity as the port has room to buy —
limited by how much you're carrying and the port's remaining storage.
Each buy/sell action trades the maximum possible amount in one action, so
there's no need to haggle over quantities — just decide what to buy and sell,
and repeat the loop between ports.
Your total cargo capacity is fixed by your ship's cargo holds stat (see
Ships). The Ship Info panel shows how much free space you have
left.
Trade Routes
Once you've discovered two ports, you can set up an automated trade
route between them using one of your ship's trade drones.
- A drone travels back and forth along the route on its own, automatically
buying and selling cargo at each end — no manual trading required.
- Drone travel time scales with the distance between the two ports, and
progress ticks forward as you move around the galaxy.
- Routes can be upgraded to carry more cargo per trip, or reinforced with
fighters from your own ship to help defend them from attackers.
- Other players can discover and attack your trade routes if they stumble
onto one of the ports it uses — so a well-defended route is a safer route.
Managing Routes
All of your routes are listed in the Ship Info panel (the info button
on the map). Each row shows the route's endpoints, fighters (FGT),
cargo capacity (CAP) and net credits earned (CR), with controls
alongside:
- FGT
- / + — move one fighter from the route back to your ship, or
from your ship onto the route.
- CAP
- / + — spend a trade drone to add 5 holds of capacity, or
give up 5 holds (down to the base 5) and get the drone back.
x — delete the route. Fighters on the route are lost.
Managing routes is free — none of these actions cost turns — and you can do
it from anywhere; you don't need to be at one of the route's ports.
Trade routes are a great way to keep earning credits passively while you're
off exploring or fighting elsewhere.
Note that you can't create a trade route to or from a port located in
Fedspace — manual trading there is still fine. Routes also
never pass through wormholes: drones fly the hex-by-hex path,
so ports on different islands can't be linked.
Combat
Combat in STAR DEWAR revolves around two stats: fighters and
shields.
- Shields absorb incoming damage first.
- Once shields are depleted, damage spills over onto fighters.
- A ship (or trade route) is destroyed when it has no shields and no
fighters left.
Starting a Fight
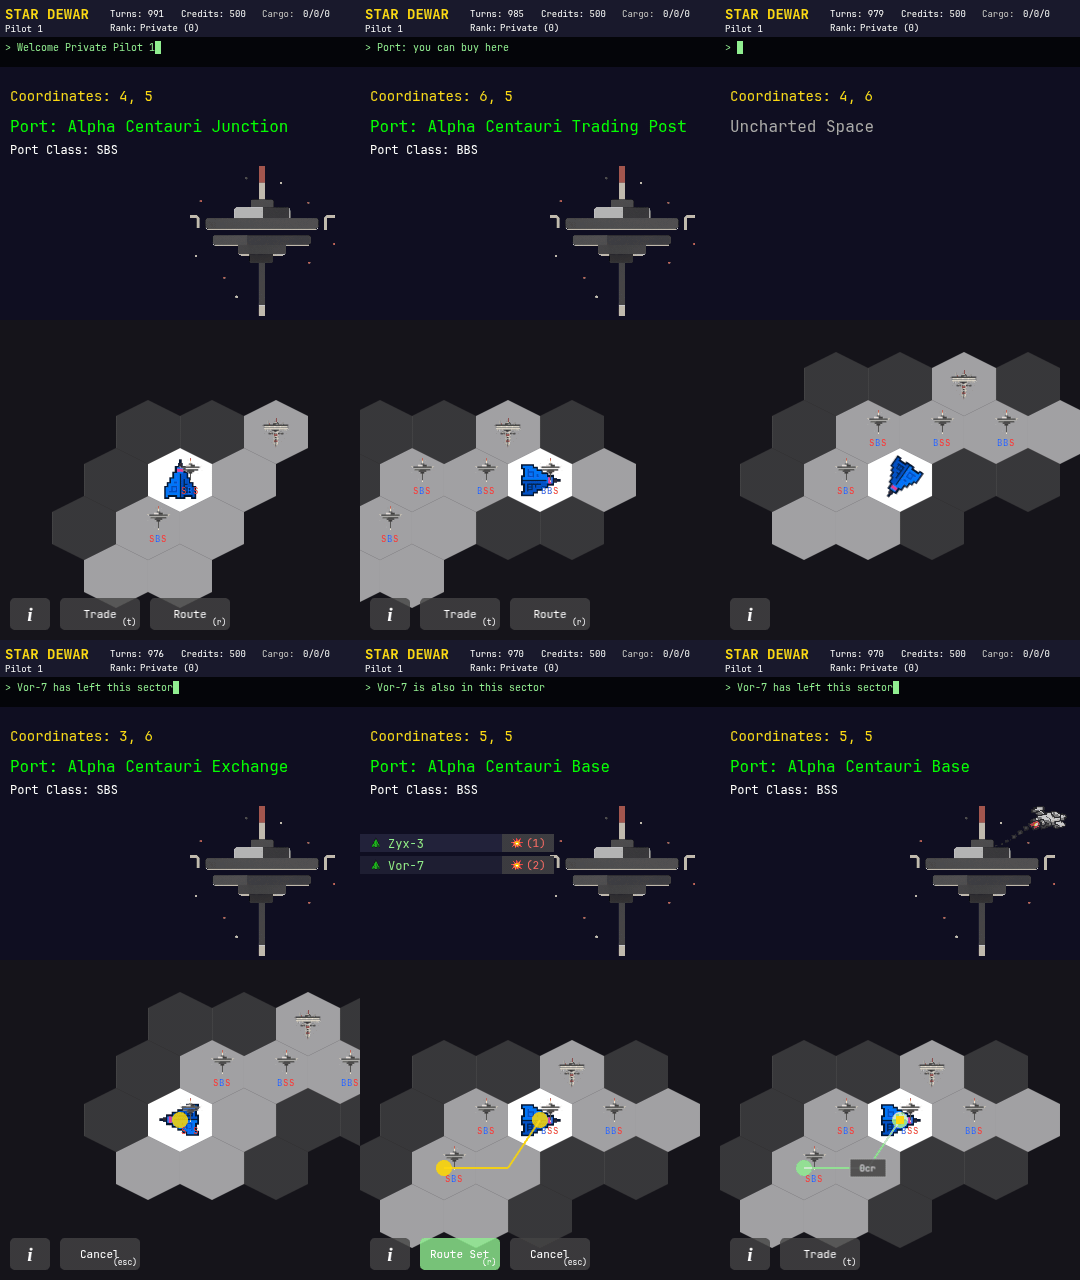
You can attack another player's ship or an alien trader if you're in the
same sector as them, attack a trade route by standing at one of its ports,
attack another player's sector fighters, or attack a
defended planet after landing on it. Escape pods can't attack,
and can't be attacked. You also can't initiate combat while you're in
Fedspace — the safe zone near the starting sector and Stardock.
Whenever there is something to fight in your sector, the sector panel shows
a red notice such as "1 ship, 1 trade route here - press 💥 (f) to enter
combat" and a 💥 button appears next to the ☰ menu at the top of the
map. Click it (or press f) to open the combat menu: one row per
target with a 💥 (n) button. Press the row's number (1, 2, ...) or
tap the button to start the fight. The 💥 button is only shown while there
is at least one target you can attack.
Once you initiate combat, both you and your target are locked in combat for
a limited time. During this window, neither of you can be dragged into a
different fight.
Committing Fighters
When you attack, you choose how many of your fighters to commit using a
slider — up to your ship's fighters per attack limit.
- Each ship type has a maximum number of fighters it can commit per attack
round, regardless of how many it carries in total. A Scout Marauder can
send up to 250 per round; a StarMaster up to 1,000. Check the
Ships page for each ship's limit.
- Damage you deal is your committed fighters × your combat odds.
- Fighters are destroyed in a 1:1 exchange with the damage they deal or
absorb. Commit 10 fighters and destroy 10 of the enemy's — you lose 10 of
your own too. Commit 10 and only destroy 5 — you only lose 5.
- If your attack destroys the target outright, the fight ends immediately.
- If the target survives, it retaliates with everything it has left —
all of its remaining fighters, scaled by its own combat odds.
Combat can run for several rounds within the time limit, with each round
following the same attack-then-retaliate pattern.
Retreating
Instead of attacking, you can retreat. Your opponent gets one free
retaliation strike with all of their remaining fighters before you're
teleported to a random adjacent sector. If that retaliation destroys you,
you become an escape pod just like in a normal loss. The same applies when
retreating from a defended planet: its planetary fighters fire a parting
shot at 2:1 odds as you leave.
Losing a Fight
If your fighters and shields both hit zero, your ship is converted into an
escape pod — you lose your fighters, shields, trade drones, and cargo,
and your cargo capacity drops sharply until you can afford a new ship at
Stardock. You'll also lose a percentage of your accumulated
experience.
Destroying an enemy ship, an alien trader, or a trade route earns you
experience — the bigger the target, the bigger the reward.
Trade Route Defense
Trade routes defend themselves at favorable odds, and you can strengthen a
route further by moving fighters from your own ship onto it using the
FGT + control in the Ship Info panel (see
Trading). A well-defended route is much harder for other
players to destroy.
Planetary Defense
Planets with a Level 2+ Citadel can hold fighters and, at Level 5, planetary
shields. Planetary fighters defend at 2:1 odds and each planetary shield
absorbs 10 damage before fighters take losses. To capture a defended planet
you must land and choose Attack Planet (hotkey a); combat follows the
same commit-and-retaliate pattern as ship combat. Beware of Level 3+ planets
— their Quasar Cannon may fire on you when you enter the sector or attempt to
land. See Planets for details.
Sector Fighters
You can leave fighters behind to guard a sector in Offensive,
Defensive or Toll mode. They fight at 1:1 odds and show up as a row
in the combat menu (f) whenever you share a sector with them.
See Sector Fighters for the full rules.
Alignment
Your alignment measures how good or evil you are:
- Positive — good
- Zero — neutral
- Negative — evil
Alignment is displayed in your status bar and affects how much you gain or
lose from combat.
Actions That Change Alignment
| Action |
Effect |
| Destroy an evil ship or alien |
Gain alignment |
| Destroy a good ship or alien |
Lose alignment |
| Build a planet (genesis torpedo) |
+5 |
| Destroy a planet (atomic detonator) |
−100 |
| Jettison colonists |
−1 per colonist (only if alignment ≥ 0) |
| Attack a ship (non-kill rounds) |
Changes based on your fighter losses |
| Attack a trade route |
No change |
Destroying a Ship
When you completely destroy another ship, the change is based on the
victim's alignment, not the number of fighters involved.
Opposite sides — good/neutral attacker vs evil victim, or vice versa:
Change = |Victim Alignment| / 2
Same side — both good or both evil:
Change = |Victim Alignment| / 4
The minimum change is ±1 whenever the victim has any non-zero alignment.
Example — neutral player destroys an evil alien with alignment −250:
Change = 250 / 2 = +125
Non-Kill Combat Rounds
When fighters are exchanged but neither ship is destroyed, your alignment
changes based on your own fighters lost, not the enemy fighters you
destroyed:
Change = −(Your Fighters Lost × Defender Alignment) / Scale

Scale = 5,000  if your alignment ≥ 0
Scale = 10,000 if your alignment < 0
Attacking an evil defender (negative alignment) gains you alignment;
attacking a good defender loses you alignment.
Example — neutral attacker (scale 5,000) loses 10 fighters against a
defender with alignment −5,000:
Change = −(10 × −5,000) / 5,000 = +10
Alien Alignment
Half of all alien traders are good (alignment +100 to +3,000) and half are
evil (alignment −100 to −3,000). Evil aliens carry more fighters but fewer
shields; good aliens carry more shields but fewer fighters.
Good aliens appear green; evil aliens appear red.
Fedspace
Fedspace is protected territory where players are safe from attack. It's
marked on the map with a distinct sector tint.
Where Fedspace Is
- All sectors within a set number of hops of the map's starting sector
(by default, 10% of the map's size, radiating outward).
- The Stardock sector and all of its immediate neighbors.
The Rules
- No attacking. You can't initiate combat against another player's
ship, an alien trader, or a trade route while you're in fedspace.
- No trade routes. You can't create a new trade route if
either endpoint port is located in fedspace.
- Trading is unrestricted. Buying and selling cargo manually at a port
works exactly the same in fedspace as anywhere else.
- Can't be avoided. Fedspace sectors can't be marked as
avoided — there's nothing in them to steer clear of.
Think of fedspace as a safe harbor near your starting point and Stardock —
a place to stock up, regroup, or wait out your turn regeneration without
worrying about being ambushed.
Ships
Your ship is your lifeline — it carries your cargo, defends you in combat,
and determines how far you can travel on a single tank of turns.
Ship Stats
Open the Ship Info panel (the info button on the map) to see your
current stats at a glance:
- Fighters / Max Fighters — offensive and defensive combat strength.
- Shields / Max Shields — absorb damage before your fighters do.
- Trade Drones / Max Trade Drones — used to run automated
trade routes.
- Limpets / Max Limpets — see Limpets for how to deploy,
track, and remove these tracking devices.
- Cargo Holds / Free Cargo Holds — total and remaining space for fuel,
ore, organics, and equipment.
- Turns per Warp — how many turns it costs to move one sector.
- Combat Odds — a multiplier applied to the damage you deal in combat.
- Fighters per Attack — the maximum number of fighters you can commit in
a single attack round. Even if you have more fighters on board, this caps
how many you can send at once.
Available Ships
There are four ships you can own. Each has different strengths — pick the
one that fits how you play.
Scout Marauder — 20,000 cr
The fastest ship in the game at only 2 turns per warp, with 2.0:1
combat odds. Small cargo hold and limited fighters, but it excels at
exploration and quick strikes where speed matters more than endurance.
| Stat |
Value |
| Turns per Warp |
2 |
| Combat Odds |
2.0 : 1 |
| Max Holds |
25 |
| Max Fighters |
250 |
| Max Shields |
100 |
| Fighters per Attack |
250 |
| Max Limpets |
0 |
| Max Armids |
0 |
Merchant Cruiser — 40,000 cr
The standard starting ship. A balanced mix of cargo, combat, and speed —
good at everything, exceptional at nothing. A solid choice while you build
up credits for a more specialised vessel.
| Stat |
Value |
| Turns per Warp |
3 |
| Combat Odds |
1.0 : 1 |
| Max Holds |
20 |
| Max Fighters |
200 |
| Max Shields |
100 |
| Fighters per Attack |
100 |
| Max Limpets |
0 |
| Max Armids |
0 |
Colonial Transport — 60,000 cr
The hauler. With 250 cargo holds it moves more goods per trip than
anything else in the game. The trade-off is speed (6 turns per warp)
and poor combat odds — keep it away from hostile sectors.
| Stat |
Value |
| Turns per Warp |
6 |
| Combat Odds |
0.6 : 1 |
| Max Holds |
250 |
| Max Fighters |
200 |
| Max Shields |
500 |
| Fighters per Attack |
100 |
| Max Limpets |
10 |
| Max Armids |
50 |
StarMaster — 80,000 cr
The all-rounder for experienced pilots. 5,000 fighters, 2,000
shields, and 1.4:1 combat odds make it the strongest combat ship
available while still carrying a respectable cargo load.
| Stat |
Value |
| Turns per Warp |
3 |
| Combat Odds |
1.4 : 1 |
| Max Holds |
73 |
| Max Fighters |
5,000 |
| Max Shields |
2,000 |
| Fighters per Attack |
1,000 |
| Max Limpets |
10 |
| Max Armids |
50 |
Escape Pods
If your ship is destroyed in combat, you're not out of the game — you're
just dropped into an escape pod. Escape pods have no fighters, no
shields, no trade drones, and almost no cargo space, and they're slow to
move. They also can't fight or be attacked.
To get back in the game, head to Stardock and buy any ship
from the Federation Shipyards. The purchase will immediately replace your
escape pod.
Your Fleet
You can own more than one ship at a time. Ships you've purchased but aren't
currently flying are stored in your fleet at the Stardock.
- Buying a ship while already in a non-escape-pod sends the new ship
straight to your fleet — your active ship is unchanged.
- At the Stardock, open the Federation Shipyards to see your fleet
listed below the ship-for-sale section.
- Press Use next to a fleet ship to swap it with your current ship. Your
old ship moves to the fleet; the selected ship becomes your active vessel.
Its fighters, shields, cargo, and equipment are exactly as you left them.
- Press Sell to sell a fleet ship for 50% of its purchase price.
- Press Info to inspect a fleet ship's stats before deciding.
Swapping ships costs one base action turn. Selling is free.
Growing Your Ship
Every stat besides your ship type itself is upgraded the same way: fly to
Stardock and spend credits. There's no repair mechanic beyond simply buying
back fighters and shields you've lost — so keeping your credits flowing
through trading is the best way to stay combat-ready.
Limpets
Limpets are tracking devices that let you follow another player's
movements across the map — useful for hunting targets or keeping an eye on
rivals near your trade routes.
Getting Limpets
Buy limpets at Stardock for 500cr each, up to your ship's
Max Limpets capacity (see Ships). Your current supply is
shown as Limpets / Max Limpets in the Ship Info panel.
Deploying a Mine
Fly to the sector where you want to lay a trap and press L (Deploy) to
drop one of your limpets there. This costs turns and consumes one limpet
from your supply. You can't deploy a mine in a sector where you already have
one waiting, and mines can't be placed in Fedspace, in a sector
with a port, or on a wormhole endpoint.
Your deployed limpets show on the map as a green star in the lower-right of
the hex. If another player's limpet is sitting in the sector you are in, it
shows as a magenta star instead, and the sector panel lists its owner.
Attaching
When another player (other than you) flies into a sector containing your
deployed mine, it automatically attaches to their ship. The mine is
consumed in the process — it disappears from the sector once it attaches.
- You can only have one limpet attached to a given target at a time.
- Escape pods and alien traders don't trigger limpets.
Tracking
Once a limpet attaches, you'll see that player's live location and ship
type on your map as they move, until it's removed. Tracking through a
limpet only reveals location and ship type — you won't see their cargo,
credits, or any port information they discover along the way.
Removing Limpets
If you suspect you're being tracked, check the Limpet scan row in your
Ship Info panel — it reads DETECTED if any limpets are currently
attached to your ship, or NONE if you're clear.
To remove limpets, buy a Limpet Remover at Stardock (a one-time 3000cr
purchase). Once installed, press M (Remove, 1000cr) to strip every
limpet currently attached to your ship in one go. This costs turns and
credits, and immediately cuts off tracking for every owner who had a
limpet on you.
Limpets are also removed automatically if your ship is destroyed in
combat — any limpets attached to you are detached, and their owners are
notified that they've lost your trail.
Stardock
Every map has exactly one Stardock — your home base for gearing up.
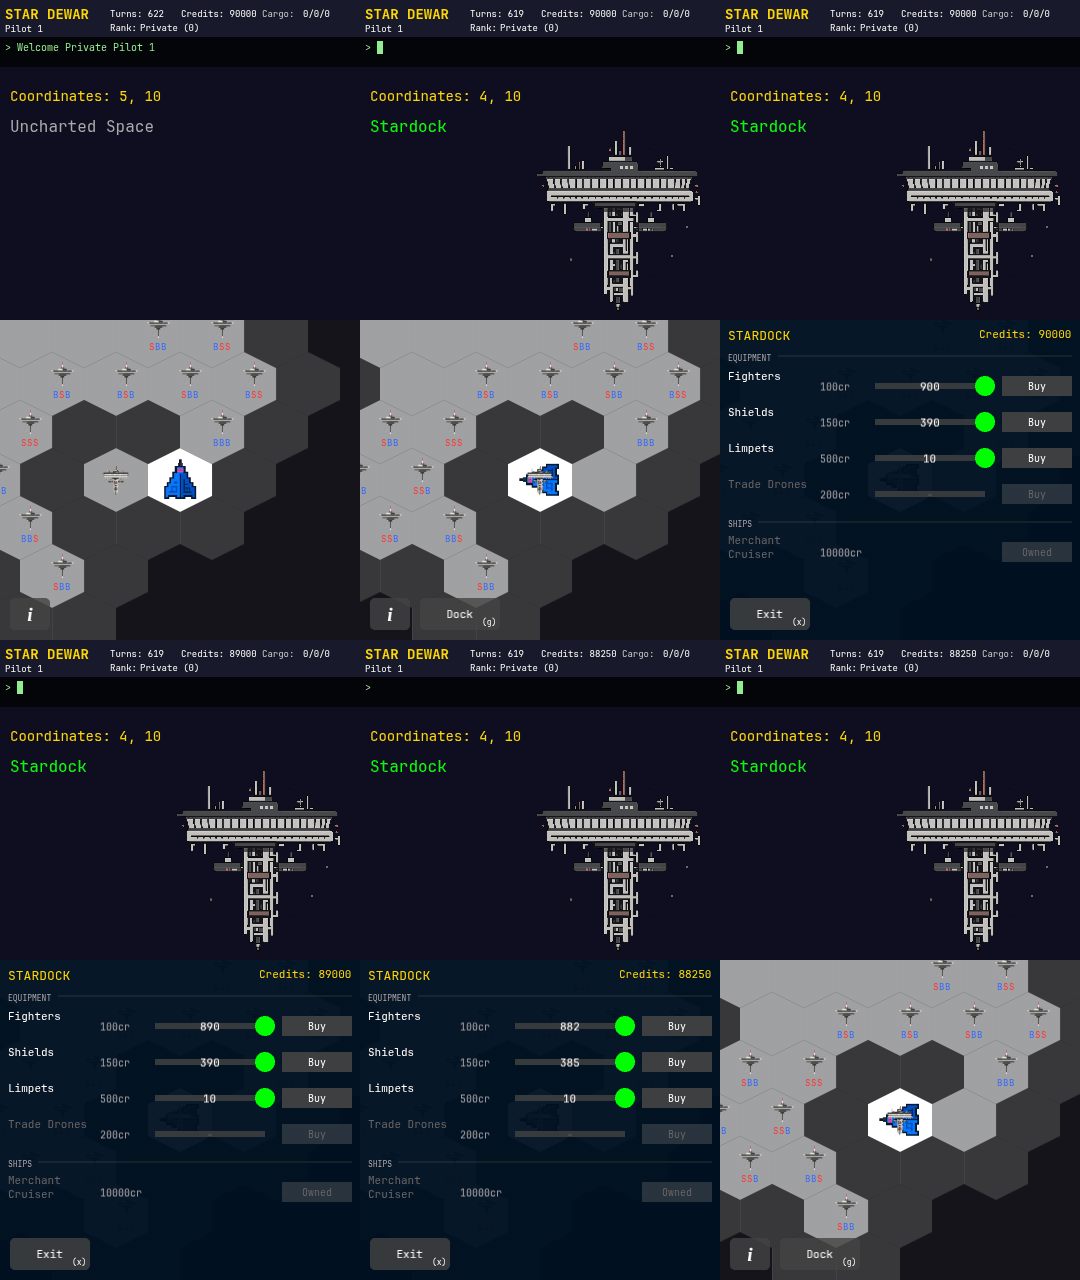
Fly to the Stardock sector and open the docking panel (hotkey G) to
access the shop. You must be physically at the Stardock to buy anything.
Stellar Hardware Emporium
Upgrade your active ship's equipment:
| Item |
What it does |
| Fighters |
Increases your combat strength, up to your ship's maximum. |
| Shields |
Increases the damage you can absorb before losing fighters. |
| Trade Drones |
Lets you run more trade routes at once. |
| Limpets |
Tracking devices you can attach to other players' ships. See Limpets. |
| Armid Mines |
Offensive mines you can deploy in sectors. See Armid Mines. |
| Limpet Remover |
A device that lets you scan for and remove limpets attached to your ship. |
| Density Scanner |
Shows the density of every sector next to you: planets 500, ports and the Stardock 100, ships 40, mines 10 each, sector fighters 5 each. See Travel. |
Use the slider on each item to choose how much to buy, up to whatever you
can afford and whatever your ship has room for. Escape pods cannot carry any
of these items.
Federation Shipyards
Buy new ships and manage your fleet.
Buying a Ship
Four ships are available for purchase. Press Info on any ship to see its
full stats before committing. Press Buy to purchase it.
- If you're in an escape pod, buying a ship immediately replaces it —
you'll be flying the new ship right away.
- If you're already in a non-escape-pod ship, the purchased ship goes
straight into your fleet. Your current ship is unchanged.
Your Fleet
Ships you own but aren't actively flying are stored in your fleet, listed
below the for-sale ships. Each fleet ship shows its stored fighters, shields,
and cargo holds at a glance, with three buttons:
| Button |
What it does |
| Use |
Swap this ship with your current active ship. Costs 1 turn. Your old ship moves to the fleet with all its contents intact. |
| Sell |
Sell this fleet ship for 50% of its purchase price. No turn cost. |
| Info |
View the fleet ship's full stats — fighters, shields, cargo, armids, and more. |
Recovering From a Loss
If you've been reduced to an escape pod, Stardock is where you come back
from it. Buy any ship from the Federation Shipyards to replace your escape
pod immediately. You'll need to restock fighters and shields separately from
the Stellar Hardware Emporium.
Terra
Terra is the homeworld of humanity — a Class M planet always located at your
starting sector. Every new player begins adjacent to it, and it's always
visible on your map from the moment you log in.
What Terra Does
Terra is the galaxy's only source of colonists. Colonists are workers you
load onto your ship and then transport to other planets, where they produce
resources over time.
To load colonists, fly to the Terra sector and open the docking panel
(hotkey G). From the Terra lobby, tap Load Colonists to open the
colonist transfer screen, where you can use the slider to choose how many to
take. Colonists fill your ship's cargo holds, so make sure you have free
space before loading.
Things to Know
- Terra itself produces no resources and cannot be colonized further.
- You can only load colonists from Terra — you can't drop colonists back
onto it.
- Colonists on your ship occupy cargo holds the same way commodities do.
- Terra cannot be used as an endpoint for trade routes.
- Combat and trade routes are both disallowed in the Fedspace zone surrounding
Terra and the starting sector.
Planets
Planets are colonizable worlds scattered across the map. Roughly one in
fifty sectors outside Fedspace starts the season with a natural
planet, and more can be created with genesis torpedoes. Once you settle a
planet with colonists, it generates resources automatically over time — a
steady passive income on top of your trading profits.
Planet Classes
Every planet has a class that determines what it's good at producing. Each
colonist produces a fixed number of resource units per hour:
| Class |
Fuel Ore |
Organics |
Equipment |
| M |
0.10 |
0.08 |
0.08 |
| L |
0.12 |
0.12 |
0.07 |
| H |
0.20 |
0.00 |
0.04 |
Class H planets are fuel specialists but produce no organics at all. Class L
planets are well-rounded for fuel and organics. Class M is the general-purpose
baseline.
Colonizing a Planet
- Load colonists from Terra onto your ship.
- Fly to the planet you want to settle.
- Land (hotkey
L) and choose Claim Planet if you don't own it yet.
- Choose Colonists and use the Unload slider to drop colonists onto
the planet.
Once colonists are on a planet, use the Assign sliders to split them
among the three resource types — fuel ore, organics, and equipment. The
panel shows an estimated daily production based on your current assignment.
Claiming Ownership
Only the owner of a planet can open its Colonists, Resources and
Citadel panels, or create trade routes from it. Other players see just
the planet's name, class, owner, Citadel level and whether it is defended —
colonists, stockpiles, Treasury and exact defense counts are hidden until you
own it. Planets created with a genesis torpedo belong to the player who fired
it; planets found on the map start unclaimed.
To take a planet, land on it and choose Claim Planet (hotkey c). This
costs one turn. Claiming works on unclaimed planets and on planets owned by
other players — everything on the planet (colonists, stockpiles, Citadel,
Treasury, fighters and shields) transfers to you.
Planets with a Level 2+ Citadel that still have fighters or
shields cannot be claimed until their defenses are destroyed. When you land
on such a planet — whether it is owned by another player or unclaimed — the
docking panel shows Attack Planet (hotkey a) instead of Claim
Planet. Attacking a planet works like attacking a route: choose how many
fighters to commit and fight it out against the planet's shields and
fighters. Once both reach zero, land again and Claim Planet appears.
You can only attack a planet from its docking panel after landing; there is
no attack option from the sector map.
Players with an administrator account always see both Attack Planet and
Claim Planet on a defended planet and may claim it directly, bypassing
its defenses. Test accounts on local development servers are administrators.
Citadels
Citadels are permanent upgrades that turn established planets into economic
and military strongholds. Open the docking panel and choose Citadel to
build or manage one. Only the planet owner can do this.
Citadels have six levels, which must be built in order:
| Level |
Unlock |
Colonists |
Ore |
Organics |
Equipment |
Time |
| 1 |
Treasury |
500 |
300 |
200 |
250 |
6 hours |
| 2 |
Combat Control System |
1,000 |
200 |
50 |
250 |
12 hours |
| 3 |
Quasar Cannon |
1,500 |
500 |
250 |
500 |
1 day |
| 4 |
Planetary TransWarp |
2,500 |
1,000 |
1,200 |
1,000 |
2 days |
| 5 |
Planetary Shielding |
2,500 |
300 |
400 |
1,000 |
1 day |
| 6 |
Interdictor Generator |
3,000 |
1,000 |
1,200 |
2,000 |
3 days |
Costs are per upgrade, not cumulative. Colonists must be present but are not
consumed; commodities are consumed when construction begins. Construction
continues in real time while you are offline, and the existing level keeps
working while the next one is being built. Only one upgrade may be under
construction at a time.
Citadel upgrades stay with the planet if another player captures it.
Level 1 — Treasury
Deposit credits into the planet or withdraw them later. Treasury credits
belong to the planet: whoever captures the planet captures its Treasury.
Level 2 — Combat Control System
Transfer fighters between your ship and the planet. Planetary fighters defend
at 2:1 odds. A planet with fighters can no longer be claimed by simply
landing — a hostile player must first land and use Attack Planet (hotkey
a) from the docking panel to destroy its fighters and shields.
Level 3 — Quasar Cannon
The Quasar automatically fires at hostile ships using the planet's fuel ore
stockpile. Configure two reaction percentages:
- Sector: fires when a hostile ship enters the sector.
- Landing: fires when a hostile ship attempts to land.
Each shot uses floor(fuel_ore × percent / 100) ore, capped at 500, and
deals one damage per ore (shields first, then fighters). With no fuel ore the
cannon does nothing.
Level 4 — Planetary TransWarp
Move the entire planet — colonists, stockpiles, Citadel, Treasury, fighters
and shields — to another sector. Costs 400 fuel ore per sector of path
distance. The destination must be a sector you have discovered that is not
in Fedspace and does not contain another planet, Terra or the Stardock. You
cannot TransWarp while an upgrade is under construction.
Level 5 — Planetary Shielding
Convert ship shields into planetary shields at 10:1. Each planetary shield
absorbs 10 damage and is destroyed before planetary fighters take losses.
Conversion is one-way.
Level 6 — Interdictor Generator
When enabled, hostile ships attempting to leave the sector are held in
place. Each blocked escape consumes 500 fuel ore, still costs the ship its
movement turns, and triggers another Quasar sector shot. If the planet has
fewer than 500 fuel ore the ship can leave normally.
Capturing a Citadel Planet
Once a planet's fighters and shields are both zero, land and choose
Capture Planet. You receive everything on it — but for safety the Quasar
Cannon is reset to 0% and the Interdictor is disabled; the new owner must
reconfigure them.
What Other Players See
The sector information panel shows a planet's name, class, owner (or
"Unclaimed") and Citadel level to everyone. Exact fighter and shield counts
are only visible to the owner from the Citadel panels; other players learn
whether a planet is defended when they land on it.
Collecting Resources
Resources accumulate in the planet's stockpile automatically. To collect
them, fly to the planet and open the Resources panel. From there you can
load the stockpile directly into your cargo holds and haul it to a port to
sell.
The same panel also lets you go the other way: Unload (hotkey u) moves
fuel ore, organics and equipment from your ship's cargo holds into the
planet's stockpile. Each commodity you are carrying gets its own slider,
defaulting to everything on board. Useful for stocking a planet ahead of a
Citadel upgrade. Costs one turn.
Things to Know
- Production ticks once per hour per colonist — stockpiles grow while you're
offline.
- Colonists already on a planet don't need to be replaced; they produce
indefinitely.
- An undefended planet can be claimed by any player who lands on it, so a
valuable planet without Citadel defenses is at risk.
- A Quasar Cannon and Interdictor both run on the planet's fuel ore. Keep the
stockpile topped up or they will fall silent.
- Trade routes cannot originate from a planet in Fedspace.
Travel Screen
The Travel screen gives you quick navigation shortcuts so you don't have to
manually scroll the map to find key destinations. Open it from the map area
action buttons.
Fixed Destinations
The top row always shows two quick-jump buttons:
- Stardock
(1) — jumps directly to the Stardock sector.
- Terra
(2) — jumps directly to Terra, the colonist homeworld.
Tapping either button immediately closes the Travel screen and begins flying
your ship toward that destination.
Custom Slots
Below the fixed buttons are two saved location slots (3) and (4).
Each slot can hold any sector coordinate you want to return to often — a
productive planet, a favourite port, a staging point deep in the map, etc.
Saving a Location
Tap the edit button next to an empty or existing slot to open the edit
screen:
- Coords — enter the
q,r cube coordinates of the sector you want to
save, or tap use current loc to fill in your ship's current position
automatically.
- Name — an optional label shown on the button (e.g. "Gold Mine" or
"Pirate Base").
Tap Save to store the slot. The button on the main Travel screen updates
immediately.
Direct Coordinate Jump
At the bottom of the Travel screen is a Coords text field. Type any
q,r coordinate and tap Travel to fly there directly — useful for
navigating to a specific location you've noted down without saving it as a
slot.
Wormholes
Automatic path plotting — from the Travel screen or by tapping the map —
routes through any wormholes you have discovered when that
makes the trip shorter.
Avoiding Sectors
If a sector is dangerous — a minefield, a hostile planet, a pirate hangout —
you can mark it as avoided:
- Fly to the sector, open the action menu (
☰ or Space) and choose
Avoid Sector (V).
- The sector is tinted red on your map.
- From then on, automatic path plotting will never route through it. If
the only way to your destination crosses an avoided sector, the trip is
refused with a console message instead.
Avoided sectors are per player and are remembered between sessions.
Marking a sector costs no turns.
Travelling to an Avoided Sector
If you try to move into an avoided sector — by keyboard, by tapping it on
the map, via a wormhole jump, or from the Travel screen — you'll be asked
whether to enable travel to it. Answering Yes (y) clears the avoided
mark (the red tint disappears) but does not move you; move again to fly
there. Answering No (n) leaves everything as it is.
You can also clear the mark while standing in the sector with Unavoid
Sector (V) in the action menu.
Sectors in Fedspace cannot be avoided — they're already safe.
Density Scanning
Buy a Density Scanner at the Stardock (any ship except an
escape pod) and every sector next to you is scanned when you arrive. The
reading is shown as a small white label in the centre of each adjacent hex.
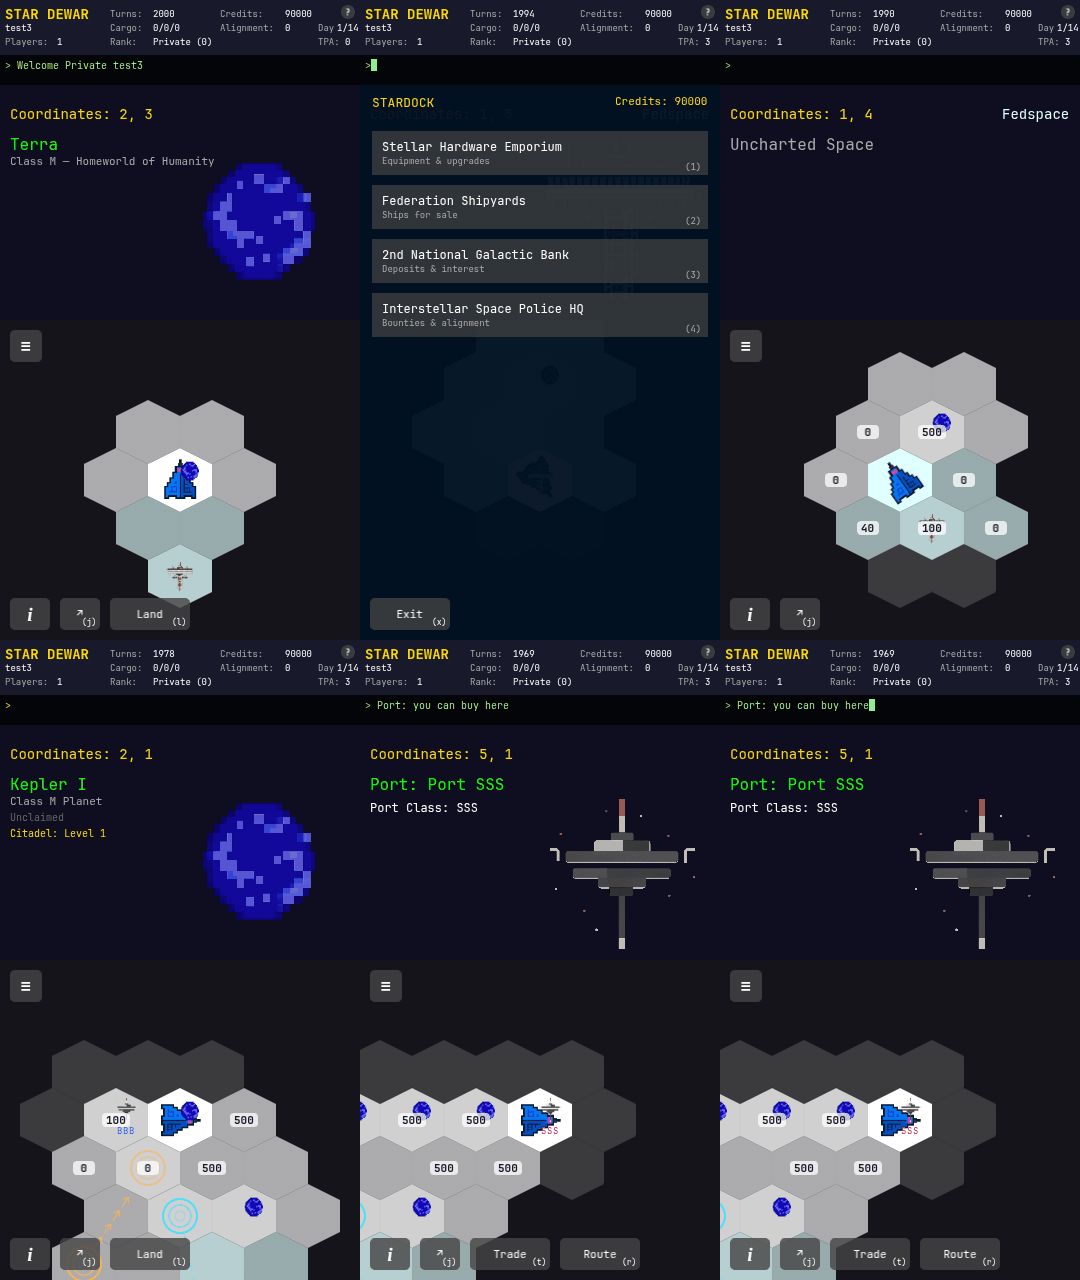
Density is the sum of everything in the sector:
| Object |
Density |
| Planet (incl. Terra) |
500 |
| Port or Stardock |
100 |
| Ship (player or alien) |
40 each |
| Mine (limpet or armid) |
10 each |
| Sector fighter |
5 each |
So 140 next door is probably a port with a ship docked at it, 30 is a
small minefield, and 0 is empty space you can see is empty.
- The scan covers the hex neighbours of your current sector (plus the far
end of a wormhole you're standing on). Your own sector isn't labelled.
- Readings are a snapshot taken on arrival — they don't update if a
ship wanders in afterwards.
- After a multi-hop trip you see the readings for every sector adjacent to
any step of the path, all at once, when you reach the destination.
- The moment you leave a sector all labels are cleared; new ones appear
when you arrive at the next.
- Scanning is free and automatic. The scanner stays with the ship it's
installed on when you swap ships at the Shipyards.
Wormholes
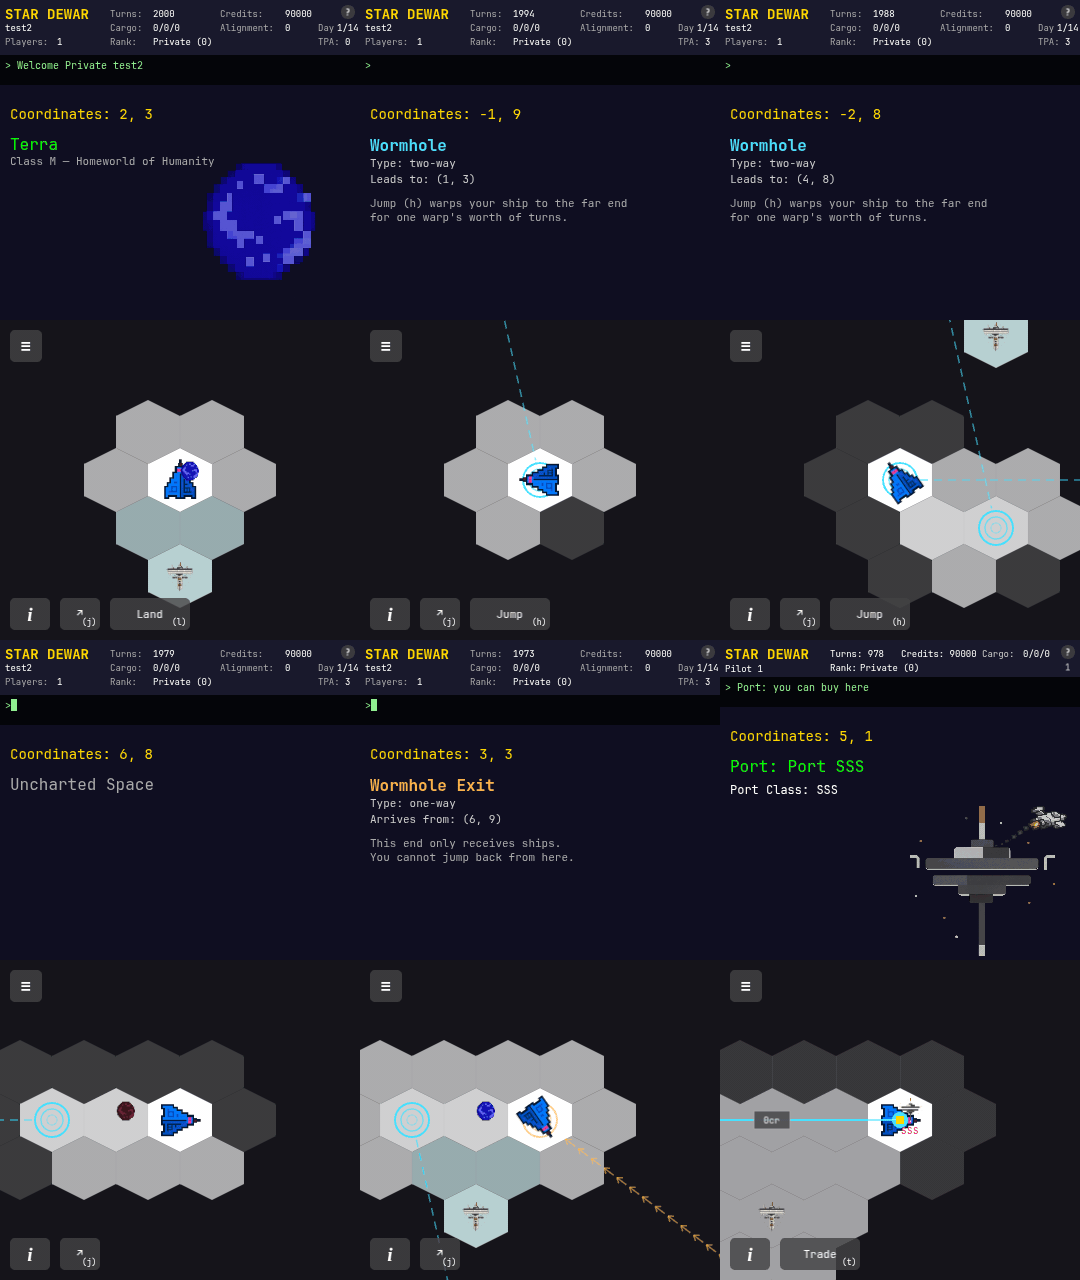
Wormholes are tears in space that link two distant sectors. Flying into one
end drops you out of the other in a single warp, no matter how far apart
the two sectors are on the map.
Parts of the galaxy are only reachable through wormholes: the map is made
of several islands of connected sectors, joined by two-way wormholes.
Other wormholes are simply shortcuts across a single island.
Two-Way and One-Way
| Kind |
What it looks like |
Behaviour |
| Two-way |
Cyan rings at both ends, joined by a dashed cyan line |
Jump from either end to the other |
| One-way entrance |
Bright amber rings; a chain of amber arrows →→→ runs from here to the exit |
Jump to the exit only |
| One-way exit |
Dimmer amber rings at the tip of the arrow chain |
Ships arrive here; you cannot jump back |
Follow the arrows: they always point the way a ship can travel.
You will never be trapped: every sector in the galaxy can always get back
to the starting sector, even if you have to take the long way round after
falling through a one-way wormhole.
Discovering Wormholes
Wormhole sectors look like ordinary space until you fly into one. Landing
on an endpoint reveals the wormhole — its far end appears on your map along
with the link line — and the information panel switches to the Wormhole
view showing the type and destination.
Jumping
- Standing on a two-way wormhole or a one-way entrance, press Jump on
the bottom button row (hotkey
h) to warp to the far end.
- Or just tap a sector on the far side: automatic path plotting uses every
wormhole you have discovered, so long trips route through them when that
is shorter.
- A jump costs exactly one warp — your ship's
turns per warp — the same
as moving to an adjacent sector. Mines and Quasar Cannons at the far end
still apply when you arrive.
Rules
- Wormholes are never inside Fedspace.
- Nothing else can occupy a wormhole sector: no ports, planets, Stardock or
Terra, and you cannot deploy limpets, armid mines, sector fighters or
genesis torpedoes there. Planetary TransWarp cannot target a wormhole sector either.
- Trade routes never pass through wormholes. Drones fly the
hex-by-hex path between their ports, so two ports on different islands
cannot be linked by a route.
- Alien traders wander through wormholes just like you do, so expect
visitors on every island.
Armid Mines
Armid mines are deployable explosives that detonate automatically when an
enemy ship enters your sector. They're a passive defensive tool — once
placed, they wait silently until triggered.
Buying Armid Mines
Purchase armid mines at Stardock under the hardware shop.
They're stored in your ship's inventory and shown in the Ship Info panel
as Armids / Max Armids.
Deploying Mines
Fly to any non-Fedspace sector and open the action menu. If you
have mines in inventory, a Deploy action will be available. Choose how
many to deploy (up to 10 per sector).
Rules for deployment:
- Escape pods cannot deploy mines.
- Mines cannot be placed in Fedspace, in a sector with a port, or on a
wormhole endpoint.
- Only one player's mines can occupy a sector at a time — you can't stack
your mines on top of another player's.
- A single sector holds a maximum of 10 armid mines.
How Detonation Works
When an enemy ship moves into a sector containing your mines, they detonate
immediately on entry. Each mine deals 30 points of damage, applied to
shields first, then fighters. All deployed mines in the sector fire at once
and are consumed whether or not they destroy the ship.
You receive a notification when your mines hit, telling you how much damage
was dealt — or confirming a kill.
Your own ship passes over your own mines without triggering them.
Destroying Your Own Mines
If you want to recover a sector (for example, to reuse it or to prevent
friendly fire on an ally), you can permanently destroy your own deployed
mines from the action menu. Destroyed mines are not returned to
inventory — they're gone for good.
Things to Know
- Your mines show on your map as an orange star in the upper-left of the
hex. Enemies don't see them until they trigger them; a stack that
survives in a sector you are standing in (for example because you are in
an escape pod) shows as a magenta star with its owner in the sector panel.
- Stacking multiple mines in one sector multiplies the damage: 5 mines deal
150 points, 10 mines deal 300.
- Mines don't expire — they stay deployed until detonated or manually
destroyed.
- A well-placed minefield on a trade corridor can disrupt enemy routes and
deny safe passage without any active combat on your part.
Sector Fighters
You can leave some of your ship's fighters behind to guard a sector. They
stay where you drop them and react to other players' ships according to the
mode you chose when deploying them. Sector fighters always fight at
1:1 odds, no matter which ship dropped them.
| Mode |
When another player enters |
When attacked |
| Offensive |
Attacks the ship immediately with every fighter in the stack. |
Fights back |
| Defensive |
Nothing — ships may pass through or stay. |
Fights back |
| Toll |
Stops the ship and demands 5 credits per fighter. |
Fights back |
Deploying Fighters
Open the action menu (Space) in any sector that is not
Fedspace, has no port and is not a wormhole
endpoint. If your ship carries fighters you will see a sector fighters
group with Offensive (F), Defensive (D) and Toll (O)
sliders. Pick how many fighters to leave behind and press Go.
- Only one player's fighters can occupy a sector, and a sector holds a
single fighter mode. Deploying onto your own stack with the same mode adds
to it; to switch modes you must Recall the stack first (the other modes
are greyed out in the menu until you do).
- Recall (
R) takes fighters from your stack back onto your ship, up to
your ship's fighter capacity.
- Deploying and recalling cost the usual action turns.
- Your stacks are drawn as a filled triangle in the lower-left of the hex —
red for offensive, blue for defensive, gold for toll — and listed in the
Ship Info panel under Fighters.
Running Into Someone Else's Fighters
Moving through a sector that holds another player's Offensive or
Toll fighters stops your ship there, even in the middle of a longer
route. Defensive stacks never stop you.
- Offensive fighters open fire as soon as you arrive: every fighter in
the stack deals one point of damage, absorbed by your shields first and
then your fighters. Because they fight at 1:1, the stack loses exactly as
many fighters as you absorb — a stack that fails to destroy you is wiped
out by the exchange.
- Toll fighters demand
fighters x 5 credits. The combat overlay opens
with three choices: Pay (p), Attack (a) or Retreat (r).
You cannot leave the sector by a normal move until you have paid, fought
or retreated. Paying costs no turns; the credits go to the stack's owner.
Leaving and coming back means paying again.
- Escape pods and alien traders are ignored by all fighter stacks, and your
own fighters never react to you.
Your own stacks appear on the map as a triangle coloured by mode (red
offensive, blue defensive, gold toll). Another player's stack appears as a
magenta triangle once you have seen it, and the sector panel shows how many
fighters are there and in which mode.
Attacking Fighters
Whenever you share a sector with someone else's fighters (any mode) and your
ship carries fighters, the stack is listed in the combat menu — press
f or tap the 💥 button next to ☰ at the top of the map, then pick
the fighters row. This opens the normal combat overlay against
the stack:
- Damage you deal is your committed fighters x your combat odds; the stack
loses that many fighters and you lose a matching number, as in any other
fight.
- Surviving fighters retaliate at 1:1 against your shields, then your
fighters.
- Retreating jumps you to a random adjacent sector; the stack fires a
parting shot as you leave.
- Wiping out a stack earns experience, and the owner is told in their
console and the universe log.
Things to Know
- Sector fighters count 5 each on a Density Scanner, so a
large stack is easy to spot from next door.
- Owners are notified whenever their fighters stop a ship, collect a toll,
take losses or are destroyed, and their map marker updates or disappears.
- Ambushes, attacks, tolls paid and retreats are all recorded in the
universe log.